Achieving flawless photos is much easier with the right makeup techniques. If you’ve ever wondered why makeup looks different in real life compared to photos, you’re not alone. The camera’s flash, lighting, and angles all play a huge role in altering your appearance. However, with a few clever makeup tricks, you can ensure that you look stunning in every shot. In this article, we’ll explore eight easy makeup tips that will help you shine like the star you are in all your photos.
1. Start with a Smooth Base

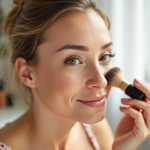
Creating a smooth canvas is crucial for any photo-ready makeup look. Begin with a good primer to even out your skin tone and minimize pores. This will ensure your foundation glides on smoothly and doesn’t settle into any fine lines. Opt for a primer that matches your skin type; mattifying for oily skin or hydrating if you’re on the drier side. Once your skin is prepped and primed, apply your foundation with a damp sponge to ensure an even, natural finish. Remember, less is more when it comes to foundation — you can always build up coverage as needed.
Adequately prepping your skin can make all the difference. Start by cleansing your face to remove any impurities and apply a lightweight moisturizer to ensure your skin is hydrated. Give your skin a few minutes to absorb the moisturizer before you move on to priming. This simple routine will keep your makeup intact throughout the day and is especially important for preventing unwanted shine or dryness when you’re in front of the camera.
2. Define Your Brows
Brows truly shape your face and can make or break a photo. Well-defined brows add structure and balance to your facial features, drawing attention to your eyes. Use a brow pencil or powder to fill in sparse areas, ensuring to follow the natural arch of your brow. It’s important to blend well to avoid any harsh lines. Finish by brushing your brows with a clear or tinted brow gel to keep them in place throughout the shoot.
3. Accentuate the Eyes
Your eyes are the window to your soul, and great eye makeup can immensely boost your photo appeal. Start by using an eyeshadow primer to keep your eyeshadow in place. Use lighter shades on the inner corner of the eye and gradually add darker shades towards the outer corner for an elongating effect. Don’t forget to curl your lashes and apply a volumizing mascara. A lengthening mascara will enhance the eyes without making them look too dramatic.
Here’s a quick checklist to help your eyes stand out:
- Apply primer to prevent creasing.
- Use shades that complement your skin tone.
- Curl lashes and apply mascara for extra volume.
- Add a touch of highlighter to the inner corners for a brightening effect.
4. Use Contour and Highlight
Contour and highlight are your best friends when it comes to sculpting your face for photos. Begin by figuring out your face shape and apply bronzer or contour powder to areas such as the hollows of your cheeks, jawline, and the sides of your nose. Use a highlighter on the high points of your face — such as the tops of your cheekbones, the bridge of your nose, and your cupid’s bow — to enhance your natural features. The goal is to create subtle shadows and highlights for dimension, which will translate beautifully in pictures.
5. Perfect Your Pout
Your lips are a focal point in photos, so treat them with care. Start by exfoliating your lips to remove any dry flakes and follow up with a balm to hydrate. Choose a lip color that suits your skin tone and enhances your look. Bold colors like reds and berries are photo-friendly, but don’t shy away from nudes or pinks if that’s what you’re comfortable with. Use a matching lip liner to define your lips and prevent the color from feathering for a clean look in photos.
Conclusion
Looking amazing in photos can be as simple as adjusting your makeup routine. By following these easy tips, you can achieve a camera-ready look that enhances your natural beauty. From ensuring a smooth base to perfecting your pout, each step matters in crafting a look that’s both flattering and picture-perfect. Practice these techniques, and soon, you won’t hesitate to say cheese for the camera!
Frequently Asked Questions
1. What type of foundation is best for photos?
Choose a foundation with a matte finish to prevent a shiny appearance in photos. Avoid those with SPF, as they might cause flashback.
2. How do you prevent makeup from looking cakey in photos?
Use a good primer and apply foundation with a damp sponge to ensure an even application. Build coverage gradually.
3. Should I change my makeup routine for black and white photos?
Yes, black and white photos rely heavily on contrast. Enhance contours and highlights for a more defined look.
4. How can I make my eyes look bigger in photos?
Use lighter eyeshadows on the inner corners and darker shades on the outer corners. Curl your lashes and apply mascara for added definition.
5. What’s the best way to choose a lip color for photos?
Consider your skin tone — bold colors like reds work well, but ensure they complement the rest of your makeup for harmony in your look.